MENU

Beginners Guide
By Unite Academy

Table Of Content
-
Who is this guide for?
-
What is Pokemon Unite
-
Map
-
Lanes
-
Strong lane
-
Weak lane
ABOUT
Hey there, Trainers! I’m Daniel Hernandez aka BlackCH, and I’ll be your guide through this beginner’s journey into competitive Pokémon Unite.
With experience competing on four different professional teams and winning the 2024 Last Stretch tournament, I’ve spent countless hours mastering the mechanics, strategies, and teamwork needed to climb the ranks in Unite. But beyond competitive play, I’m passionate about uplifting newer players because everyone starts somewhere, and with the right knowledge, you can improve faster than you think.
This guide is built from everything I’ve learned through scrims, ranked grinds, team tournaments, and coaching others. Whether you’re just starting out or trying to go from casual to competitive, I’ll help you understand not just how to play—but why things work the way they do.

Who Is This Guide For?
This guide is intended for beginner to intermediate players who want to improve their competitive play in Pokémon Unite, specifically on the Theia Sky Ruins map. It’s ideal for players who are comfortable with the basics of the game but want to understand how to play as a team, rotate properly, manage objectives, and make smart decisions during each phase of a match. Whether you're playing solo or preparing to join a team, this guide will help you build a solid foundation in competitive strategy.
What is Pokémon Unite?
Pokémon Unite is a free-to-play MOBA (Multiplayer Online Battle Arena) game developed by TiMi Studio Group and published by The Pokémon Company for Nintendo Switch and mobile devices. It combines the strategic, team-based gameplay of MOBAs like League of Legends or Dota 2 with the familiar world of Pokémon. The key difference is that instead of knocking down towers, players compete in 5v5 matches to score points by defeating wild Pokémon and dunking energy (Aeos energy) into the opposing team's goal zones.To win a match of Pokemon Unite you must score more point than your opponent before the time runs out (10 minutes)
Disclaimer
The strategies outlined in this guide are considered standard and widely used in competitive play. However, Pokémon Unite is a dynamic team-based game where adaptability, timing, and coordination matter just as much as planning.
These strategies should serve as a strong foundation, but they are not the only way to play. Team compositions, player decisions, and in-game situations may require you to adjust your approach.
This is just one of many viable strategies. Use what works best for your team, your goals, and the evolving meta.
MAP AND LANES
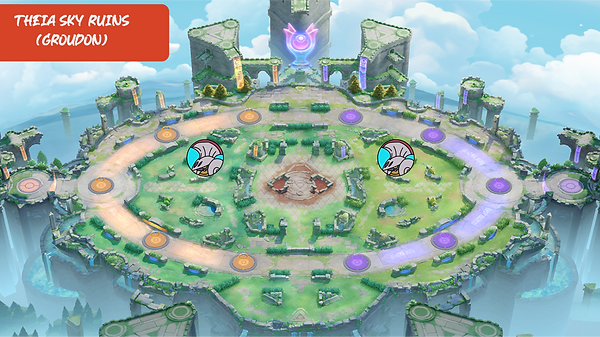
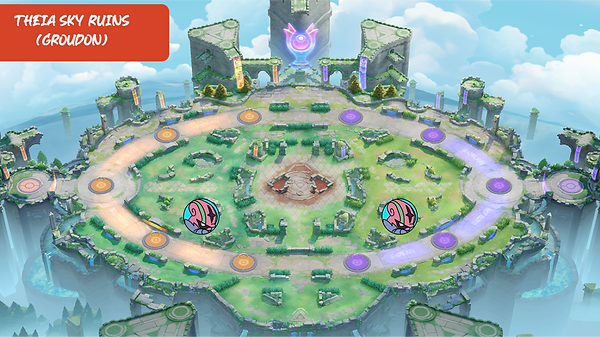
Map (Theia Sky Ruins Groudon)
This is map we are going to use for competitive gameplay, Left side is called purple side and right side is called orange side, the map is symmetrical meaning that there are NO differences on the side you are on during the game, the only difference is outside the game which is drafting priority (purple team always bans and picks first).

Lanes
The map is divided in 3 lanes which have different wild pokemon, objectives and experience value (Top Lane, Jungle and Bot Lane)

Top Lane
The upper path on the map (highlighted in purple) is typically where you’ll find Bruisers (All-Rounders or Defenders) and Supports. While this is the most common setup, team strategies may vary, and other roles might appear here depending on the game.
There are three types of wild Pokémon that spawn in this lane:
-
Bunnelby: Spawns in the Flux Zone (Speed Zone) 7 other Bunnelby will spawn in the top lane.
-
Natu: 3 Natu will spawn in the neutral area of the Top Lane. You’ll need to contest these with the enemy team for bonus experience.
-
Regis(Top Regi): At minute 7 regieleki or 1 of the 3 original regi (Ice, Steel, Rock) will spawn instead, after that they will keep spawning every 2 minutes .
Easy Pokemon to learn the lane:
Carry: Lucario, Buzzwhole, Azumarril
Exp Share User: Eldegoss, Blissey, Comfey
Jungle
The middle path on the map (highlighted in blue) is typically where early-game power spike attackers, speedsters, and all-rounders go. It’s important to pick a jungler who is strong early on, so they can effectively gank and help your team snowball, opening the door to various strategies. The jungler’s main objective is to clear jungle camps and then gank one of the other two lanes.
There are four types of wild Pokémon that spawn in this lane:
-
Xatu: The first Pokémon to spawn in the jungle, granting a large amount of experience and guaranteeing you reach Level 3 right at the start.
-
Baltoy: Spawns in the jungle shortly after the game begins.
-
Escavalier (Red Buff): Spawns on the top side of the jungle. Defeating it grants a lot of EXP and applies a slow effect on enemies hit by your basic attacks.
-
Accelgor (Blue Buff): Spawns on the bottom side of the jungle. Defeating it grants a lot of EXP and provides a cooldown reduction (CDR) buff.
Easy Pokemon to learn the lane:
Leafeon, Absol, Ceruledge, Gardevoir, Sylveon
Bot Lane
The bottom path on the map (highlighted in red) is usually where Attackers and Tanks play. This lane offers the most overall EXP, as you gain tons of EXP per Indeedee and a significant amount from the Bottom Regi objective. If you are in the weaker lane, you typically play a late-game scaling attacker; if you are in the stronger lane, you usually pick an early-game attacker, often paired with a tank that complements both playstyles.
There are 6 types of wild Pokémon that can spawn in this lane:
-
Bunnelby: Spawns in the Speed Flux at the start of the game and some will spawn in the middle of the lane.
-
Indeedee: 2 will spawn in each side.
-
Baltoy: Spawns near the goals.
-
Regis(Bot Regi): The Regis are the most important objectives in the bot lane. A Regi spawns at the 7-minute mark and will respawn 2 minutes after being defeated.
Easy Pokemon to learn the lane:
Pikachu, Gardevoir, Espeon
EXP Share user: Snorlax, Crustle, Umbreon
Strong Lane
A strong lane is the lane on your team that has a natural advantage in the early game, whether through damage, crowd control, secure ability, or sustain. It usually consists of Pokémon that:
-
Win 2v2 trades consistently
-
Secure wild Pokémon quickly
-
Pressure the enemy goal
-
Can safely overextend without being punished early
Strong Lane Traits:
-
Early-game power spikes (e.g., Mamoswine, Snorlax, Eeveelutions)
-
High wild Pokémon secure (e.g., Mew, Sobble, Snorlax)
-
Durability or sustain (e.g., Hoopa, Eldegoss)
-
Good synergy between roles (e.g., Tank + Ranged Attacker)
Purpose of the Strong Lane:
-
Dominate early farm to hit level spikes first
-
Create lane pressure and deny enemy EXP
-
Open up early scoring or goal breaks
-
Control early map objectives (like 8:50 Altaria or 8:00 / 7:00 Regi)
In short, your strong lane sets the tempo for the early game. If played well, it creates an EXP lead that can snowball into mid and late game advantages.
Weak Lane:
A weak lane is the lane that is naturally disadvantaged in the early game due to Pokémon matchups, scaling needs, or lack of early damage and secure. These lanes are more vulnerable to pressure and are usually focused on surviving, farming safely, and reaching key level spikes.
Weak Lane Traits:
-
Late-game scaling Pokémon (e.g., Delphox, Dragapult)
-
Low early secure or burst damage
-
Fragile or low-durability picks
Purpose of the Weak Lane:
-
Play safe under goal, avoiding early knockouts
-
Farm as efficiently as possible
-
Avoid unnecessary fights
-
Call for jungle assistance if pressured
-
Reach critical levels (like 7/9) before becoming active in fights
A weak lane doesn't mean it's bad—it simply needs more time and support to shine. When managed well, a weak lane can scale into a powerful mid-to-late game threat.
Wild Pokemon / Creeps / Minions / Farm
What Are Wild Pokémon?
Wild Pokémon are neutral, non-player-controlled Pokémon that spawn on the map during a match. Defeating them grants your team:
-
Experience Points (EXP): Helps your Pokémon level up and evolve
-
Aeos Energy: Used to score points at enemy goal zones
-
Buffs or Bonuses: Some wild Pokémon grant temporary combat advantages
Why Do Wild Pokémon Matter?
-
Farming wilds is the main way to level up.
-
Securing wild Pokémon helps you evolve faster and unlock powerful moves.
-
Control over wilds can decide early-game lane strength and late-game objective fights.
WILD POKEMON GLOSARY
(yellow dots are where they spawn, other colors will be for specific spawn timers)
Bunnelby / Diggersby:


Bunnelby always spawns in the Speed Flux as soon as the game starts, with 2 Bunnelby spawning in the middle of the bot lane and 7 in the top lane. Bunnelby will evolve into Diggersby when there are 2 minutes left in the game. It is recommended to farm them well before they evolve to maximize experience gain.

Baltoy / Claydol:


Baltoy spawns in 2 lanes (jungle and bot) as well as in the Groudon pit. Baltoy will evolve into Claydol when there are 2 minutes left on the clock. Extra Baltoy will spawn in the jungle once a goal is broken

Natu
Natu spawns in a flock of 3 Natu and they will Spawn early in the Groudon Pit and in the Top Lane
Xatu


Xatu is the first Pokémon to spawn in the jungle, and defeating it rewards 250 EXP, which is enough to reach Level 3 immediately. If you are playing as the jungler, you should always start with Xatu, as it provides a fast and efficient early-game power spike.

Indeedee

Four (4) Indeedee will spawn in the bot lane, After a goal is broken, three additional Indeedee will spawn: 2 near the base and one near the Tier 2 goal. These provide valuable experience and should be prioritized when available.

Excavalier

Escavalier is one of the two jungle Pokémon that reward you with a buff upon defeat. It spawns on the top side of the jungle and provides s lot of EXP. Defeating Escavalier grants the Red Buff, which applies a slow debuff to enemies hit by basic attacks (autos).
Escavalier respawns 60 seconds after being defeated.
It's recommended to give this buff to ADCs after the laning phase, as the slow effect greatly enhances their ability to chase and secure kills.
Accelgor

Accelgor is one of the two buff Pokémon found in the jungle, spawning on the bottom side. In addition to granting s lot of EXP, defeating Accelgor rewards the Blue Buff, which provides cooldown reduction (CDR), a valuable bonus for Pokémon that rely on frequent ability usage. Accelgor respawns 60 seconds after being defeated.
Swablu / Altaria


Starting at 8:50, four Swablu and one Altaria will spawn in the middle area between the top and bottom lanes. It’s extremely important to save your cooldowns for this farm, as securing it grants valuable experience and pressure. This is also the time when junglers typically gank for the first time, so be prepared for early fights.
90 seconds after defeating Regidrago another flock of birds (Swablu and Altaria) will spawn in the Groudon pit, which can sometimes lead to the first teamfight of the game.
Altaria flocks respawn on a fixed timer throughout the match:
8:50, 7:20, 5:50, 4:20, 2:50, and 1:20.
If a goal is broken, Altaria will spawn on the side of the broken goal, making it important to track lane status.

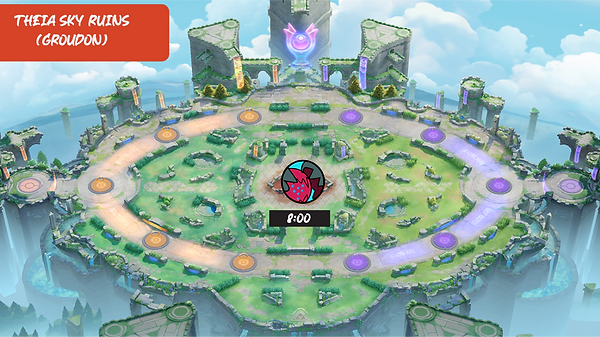
Regidrago

Regidrago appears in the central area of Theia Sky Ruins, spawning at the 8-minute mark. When defeated, the Pokémon that lands the final hit receives a goal-scoring speed buff, allowing for faster dunking on enemy goals. Following its defeat, either Regidrago will respawn later, or a swarm of Altaria and Swablu will appear in its place to keep the action unpredictable
Regieleki

Regieleki is no longer locked to the top lane, it can now spawn in either the top or bottom lane starting at the 7-minute mark, with a 2-minute respawn timer after being defeated. When your team secures it, Regieleki marches toward the nearest enemy goal. If it reaches and crashes into that goal, it disables it, letting you and your teammates instantly score without needing to charge up.

Regirock / Regice / Registeel


A random Regi will spawn in the bot or the top lane at the 7-minute mark, and will respawn 2 minutes after being defeated. Each Regi grants a significant amount of experience and a unique team-wide buff, depending on which one appears:
-
Regirock: Grants Defense and Special Defense buffs, reducing both physical and special damage taken.
-
Regice: Grants HP regeneration, healing your team over time for a short duration.
-
Registeel: Grants a boost to Attack and Special Attack, increasing the damage your team deals.

Groudon

Groudon is the final objective of Theia Sky Ruins, appearing at the 2-minute mark. Defeating it grants your entire team a potent buff, a sizable shield, a substantial attack (damage) boost, and greatly increased goal-scoring speed. This advantage lasts until a buffed Pokémon is knocked out, at which point the opponent who lands the final hit steals the effects

Laning Phase (Early Game / 10:00-7:00)
Top Lane Early Game Strategy
Both the Support and the Top Laner (usually a Bruiser or All-Rounder) will head to the top path.
If the enemy has an oppressive Support, it’s safer to focus on contesting farm and avoid early knockouts instead of forcing stacks. As for supports you should try to help your lane partner or stay in the tower and deny the enemy hp, stacks or farm.
By the 9:00 mark, make sure you're positioned near your own goal. A Baltoy will spawn in the back of your lane, take it immediately for a small but crucial experience boost.
Then, at 8:50, the first Altaria pack will spawn in the center of the top lane. This is a common spot for both junglers to gank, setting up what we call a skirmish, a small teamfight that typically involves 3–4 players instead of full teams.
At the 8:00 mark, Regidrago will spawn. This is a high-value objective, and the whole team may need to fight over it because it provides a huge damage buff along with a large amount of experience. This moment can be pivotal, as securing Regidrago can help your team force its way into a lane and set up the conditions for a swift snowball.
After the skirmish, return to farming your lane efficiently. If you're playing Support, decide whether to continue helping your top laner or roam the map to assist others.
Important Rotation Notes:
-
Supports should aim to be in the bottom lane around 7:30, to prepare for the upcoming Regi objective.
-
Top laners should stay top unless specifically asked to gank bottom. You need this time to scale or collect stacking bonuses (such as with Attack Weight or Aeos Cookie builds).
Bot Lane Early Game Strategy
Both the Attacker and the Tank should head to the bottom lane Speed Flux area and farm the first two (2) Bunnelby. Skip the last two Bunnelby so you can rotate in time to contest the mid Indeedee. Afterward, use your judgment to decide whether to contest the enemy's side farm or secure your own.
Be sure to return to your goal before the 9:00 mark to farm the back Baltoy that spawns near it. Save your cooldowns, as the Altaria will spawn in the center of the lane at 8:50. Following that, a second wave of Indeedee will appear, taking the opportunity to farm them again.
Make sure you're prepared, because at the 8:00 mark, Regidrago will spawn in the center, which often leads to the first major teamfight. After the fight, get ready for the first bottom Regi to spawn at 7:00.
Jungle Early Game Strategy.
Start by heading into the jungle and avoid soaking EXP from your laners, either wait briefly before moving in or jump over the wall to bypass their path. Begin by KO’ing Xatu, then decide which lane you want to gank. Defeat Accelgor if you plan to gank top, or Escavalier if you plan to gank bot.
Accelgor Clear Path:
Accelgor → Bot Jungle Baltoy → Top Jungle Baltoy → Escavalier → Gank Top
Escavalier Clear Path:
Escavalier → Top Jungle Baltoy → Bot Jungle Baltoy → Accelgor → Gank Bot
Keep the gank simple: focus on defeating Altaria and punishing any enemy players who overextend. Once the gank is over, return to your jungle to begin your second clear.
Be sure to arrive at the Groudon pit at least five to 10 seconds before the 8:00 mark, as Regidrago will spawn there, and this often leads to the first major teamfight. From this point on, decide your next move based on what will get you closest to level 8 or 9 to unlock your ultimate. Be sure to complete your third jungle rotation, as it almost always guarantees level 9.
Then, rotate down to contest the first bottom Regi objective.
Mid Game (7:00-2:00)
This is when the game becomes more aggressive, as most Pokémon have reached their power spikes or gained access to their Unite Moves. The overall goal for each team during this phase is to enable their three carry-role Pokémon to reach level 13 before the Final Stretch fight.
Roaming
Supports and Tanks (especially those holding EXP Share) should begin roaming the map to provide vision and gather information on enemy movements.
-
Tank: Usually stays closer to the Attacker to protect them in fights.
-
Support: Takes a flexible role, aiding both lanes as needed and keeping pressure on the map.
Offlaning
Most of the team (usually 4 players) will move and play together. However, one player, the offlaner should split off. This role is best suited for a Pokémon with high mobility (typically a Speedster or All-Rounder).
-
Their job is to pressure back caps, set up ambushes, or create flanking angles for teamfights.
Farm Priority
-
If the bottom goal has been destroyed for either team, Indeedee will stop spawning in that lane. This makes it risky for Mages or low-mobility Pokémon to farm there.
-
In that case, give jungle farm priority to your low-mobility Attacker to safely scale.
-
If both bot goals are still up, keep your Attacker in bot lane so they can continue farming Indeedee safely.
Take Risks If You Have the Upper Hand
If your team has a Unite Move advantage or level advantage, it's often worth taking aggressive actions:
-
Siege enemy towers, especially if you have Regieleki pushing with you.
-
Invade the enemy jungle to steal their EXP and limit their comeback potential.
-
The more farm you deny them, the easier it becomes to snowball into the Final Stretch.
Late Game / The Last Stretch (2:00-00)
This is the final stage of the match. Once the game reaches the 2-minute mark, not only are all scores doubled, but Rayquaza will also spawn in the center of the map (Rayquaza Pit). From this point on, macro play becomes crucial, back caps can be devastating, and the team that secures Rayquaza will most likely win the game.
1. Setting Up for Groudon
The first priority as the endgame begins is for Support and Tank players to establish vision control in the Groudon Pit, preventing the enemy from setting up ambushes. Both roles should aim to arrive at the pit 20–30 seconds before the 2-minute mark to secure space and positioning.
To keep things simple for this beginner-friendly competitive guide, we’ll introduce a basic but effective formation your team can use to set up for what is widely considered the most important teamfight in the game (see image below).


2. Suggested Formation Breakdown
-
Offlaner (High Mobility Pokémon):
Positioned on the top side, this Pokémon can scout, prevent back caps, and safely rotate if the enemy commits to an opposite-side push. Speedsters or mobile All-Rounders are ideal. -
Support:
Stays between the Attacker and Offlaner, offering healing, shields, or utility to both sides of the formation. Their role is to stabilize and react to pressure from either lane. -
Tank:
Holds the the space below Groudon, acting as the frontliner. They either engage the enemy or peel for the Attacker depending on the situation. This is a crucial position for controlling space. -
All-Rounder / Speedster (Flex):
Covers the Bot L-Bush or the bush near the bottom goal. Their role is to prevent flanks, stop sneaky scorers, or follow up on the Tank’s engage. This positioning also offers flank opportunities if the enemy overextends. -
Attacker:
Positioned at the back, usually near the choke point. This is the safest location and best suited for snipers or mages. From here, they can deal consistent poke damage while staying protected.
3. Executing the Fight and Securing Groudon
If your team successfully wipes the enemy or gains a numbers advantage, immediately shift focus to defeating Groudon. This boss grants the most powerful buff in the game which is a massive shield that also allows instant scoring.
-
Be patient and coordinated.
-
Don’t rush the Rayquaza if the enemy could steal it.
-
Once shielded, spread out to score across multiple goals.
4. Comeback Strategy: Groudon Flip
If your team is behind on points, low on levels, or simply too weak to fight head-on, your only chance may be to go for a Groudon flip, a risky but potentially game-winning play.
-
Make sure someone is ready to secure the last hit, and others are prepared to score and defend immediately afterward.
-
Remember: getting Rayquaza isn’t enough as you still need to score and protect your goals to win.
Rayquaza bush references

-
Choke point
-
Bot L bush
-
Pixel bush (Pixel bush no longer exists)
-
Top L bush
-
Bullet bush
ITEMS
There are far too many Pokémon and builds to cover them all in one guide, so here’s a life hack to help you start exploring builds and optimizing your item choices.
Just remember: Supports and Tanks should always carry EXP Share, this allows your carries to level faster while you generate passive EXP through assists and map presence.
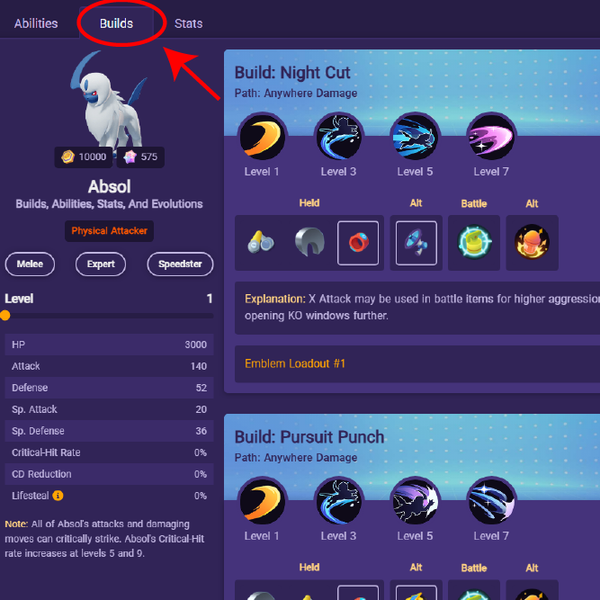
The hack? Use Unite-DB.
This website is incredibly simple and accessible. It offers up-to-date builds, recommended items, and strategies for every Pokémon in the game, making it the perfect tool for both beginners and experienced players alike.
Step 1. enter the website https://unite-db.com/
Step 2. Select a Pokemon

Step 3. Click on builds
Basic Draft Rules
Draft is arguably the most important part of the game, a bad draft can lose you the game so we are going to set some basic yet important rules that you must follow to be able to draft “optimal” team compositions
1.Never draft a weak early game jungler: your jungler must have a strong lvl 4 / 5, this way is harder for the enemy to invade in the first and second rotation of jungle camps and your gank will be able to provide more opportunities to your teammates
2.Your draft should be around your support: the supports Pokemon have strong synergies with the carries for example Blissey is extremely good for hyper carry pokemon such as strong ADC or Hoopa which enables dive comps that are extremely aggressive
3.Don’t draft 2 weak lanes: Not obligatory but it will help if you don’t draft 2 weak lanes, keep it to a minimum of 1
4.Bans for 1st pick: if you are first pick you always want to draft the strongest pokemon in the meta, so you should try to deny its counters or other strong pokemon or impactful supports.
5.Bans for second pick: you can always ban the strongest Pokemon in the meta but you do count with 2 picks right out of the bat which means that besides banning the strongest Pokemon you should ban pokemon with counterplay as you can pick 2 broken Pokemon
Flex picks: some Pokemon have builds or utility that can give flexibility to your team, Blissey for example can work well with a range hyper carry or a melee hyper carry, Sylveon can be a “bruiser or a mage”, Umbreon can be a engage tank or a healer, etc...
Pre crafted draft comps you should try!

Pokemon In Each Role
This list will help you choose Pokemon that fit each role or lane

Streamers Per Role
Top Lane: Overlord98tv
Jungle: GGKraitos
Attacker: Kyriaos
Tank: Slashcan
Support: Inder
Pokémon Unite Glossary – Competitive Terminology
ADC (Attack Damage Carry): A damage-focused role, usually played in the bot lane or jungle. Examples: Greninja, Cinderace, Decidueye, Dragapult, Duraludon.
A-press: Pressing the A button to deal basic attack damage to enemy players.
Aggro: The focus of enemy attacks or damage; taking hits or drawing enemy attention.
Attacker: Pokémon focused on dealing high damage (often includes ADCs).
Auto: Basic attacks using A-press or B-press.
B-press: Basic attacks typically used for farming.
Blue Buff: A jungle buff that grants cooldown reduction (CDR); especially beneficial for mages.
Bees / Swablu / Birds: Grouped farm that spawns on timers.
Bottom Regi: The primary objective in the bot lane (can be Registeel, Regirock, or Regice).
Bot Lane: The bottom path of the map.
Body Block: Placing your Pokémon in the way to block enemy paths or skills targeting allies.
Backing: Retreating from a fight or repositioning.
Basic / Basic Attack: Auto-attacks that deal default damage.
Backdoor: Sneaking through a less defended route to score.
Backcap: Scoring after bypassing the enemy team or defenses, often following a backdoor.
Burst: Dealing a large amount of damage in a short time using multiple moves.
Bush: Grass areas that conceal Pokémon.
Baltoy: 2-point wild Pokémon located in top and bot lanes.
Bunny: Refers to Bunnelby and Diggersby; farm that spawns in the Flux Zone and next to the goals
Cap: Scoring points in a goal zone.
CC (Crowd Control): Effects that disable or impair enemy actions (e.g., stuns, slows).
Choke: Failing under pressure during a key moment.
Choke / Chokepoint: Narrow paths leading into Rayquaza pit from the jungle.
Crit (Critical Hit): Attacks that deal bonus damage.
Call: A strategic or macro-level decision made by a team member.
Carry: A Pokémon that deals high damage and can lead the team to victory.
Clumping: Multiple team members grouping together in one area.
Damage: General term for dealing HP-reducing effects to enemies.
Draft: The pick/ban phase where players select Pokémon in a set order.
Dots: Yellow wild Pokémon spawn icons on the map (farm indicators).
DPS (Damage Per Second): The rate of damage a Pokémon can deal over time.
EX: Exceptionally powerful Pokémon.
Farm: All neutral wild Pokémon on the map that provide EXP.
Feeding: Dying repeatedly and unnecessarily, giving the enemy team an advantage.
Face Check: Entering a bush or area without vision, risking ambush.
FF: "Forfeit" — to surrender the match.
Flux / Speed Flux: The speed boost area between two goal pads.
Flip: Attempting to secure an objective quickly, even if the enemy has a better chance to secure it.
Fog of War: Areas of the map with no team vision.
Griefing: Intentionally playing to sabotage your own team.
Gank: Surprise attack from the jungle or side lanes to pressure or eliminate an enemy.
Hypercarry: A Pokémon that scales extremely well into late game and can carry fights solo.
Healing: Restoring HP to oneself or allies.
Home Base: The spawn area where Pokémon respawn and heal.
Invade: Entering the enemy jungle to steal farm or disrupt their jungler.
Int / Inting: Short for "intentional feeding" — deliberately giving kills to the enemy team.
Jungle: Central area of the map containing neutral farm.
Jungler: The player who starts in and controls the jungle farm.
Kiting: Dealing damage while retreating or avoiding enemy attacks.
Lifesteal: Healing by dealing damage through basic attacks.
Leash: Helping a teammate secure a jungle camp by hitting it without taking the last hit.
Last Hit: Landing the final blow on a wild Pokémon or enemy to gain EXP or a kill.
Limit Testing: Trying risky plays to understand a Pokémon’s full potential or boundaries.
L Bush: The four L-shaped bushes around Rayquaza pit.
Long Range: Abilities that can hit from far distances.
Macro: Strategic, map-wide decisions that impact objectives, positioning, and team movement.
Mage: A ranged, ability-focused Pokémon (often attackers or supports).
Micro: Mechanical execution of moves in battle.
Microcap: Scoring small amounts of points.
Medium Range: Abilities that hit from a moderate distance.
Neutral Farm: Wild Pokémon available to both teams.
Peel / Peeling: Protecting your damage dealer by blocking or CCing enemies.
Pocketing: Focusing entirely on keeping one ally alive (typically by a support).
Positioning: Choosing your place on the map relative to your role, team, or enemies.
Pixel Bush: The small bushes closest to Rayquaza pit.
Passive: A Pokémon’s unique innate ability that is always active or triggers under certain conditions.
Pads: Goal zones where you score or heal.
Objective: Key events with timers (e.g., Regis, Rayquaza) that provide buffs or advantages.
Off-lane: The lane opposite where your team groups more heavily (e.g., solo lane).
Overcap: Scoring more points than the remaining health of a goal pad (adds bonus points).
Roaming: Moving around the map to support other lanes.
Rotating: Moving from one lane or area to another for objectives or team fights.
Registeel: Bot lane objective that grants an attack buff to the securing team.
Regirock: Bot lane objective that grants a defense buff to the securing team.
Regice: Bot lane objective that grants healing over time to the securing team.
Ray Shield / Groudon: Shield granted after securing Rayquaza, allowing for easier scoring.
Rayquaza / Groudon: Final major objective spawning at 2:00. Securing it grants shields and often determines the match outcome.
Ray Pit / Groudon pit: The central area where Rayquaza spawns.
Regieleki: Top lane objective that pushes toward enemy goals and enables instant scoring if it crashes into a pad.
Red Buff: Jungle buff near the top side of the map. Adds a slowing effect to auto-attacks.
Rotation: Moving from one area or lane to another as a team.
Rip It: Using all your damage to quickly secure an objective.
Reset (Objectives): When an objective returns to full HP after being left uncontested.
Recall: Returning to base (usually by holding the down button).
Scout / Scouting: Checking the map or bushes for information on enemy positions.
Support: Pokémon focused on enabling allies through healing, shields, CC, and utility.
Scoring: Depositing Aeos energy in a goal zone.
Sustain / Outsustain: Healing or durability over time. Outsustaining means staying alive longer than your opponent due to healing or tankiness.
Secure: Getting the last hit on farm or an objective.
Squishy: A Pokémon with low defenses and HP; easy to kill.
Shotcaller: The teammate who leads macro decisions and directs rotations or objectives.
Stack / Stacking: Scoring while holding a stacking item to gain permanent stats.
Smite: A move with strong burst damage, capable of securing objectives reliably.
Skill / Spell: Any active ability a Pokémon can use (non-basic attacks).
Tank: A Pokémon with high durability; absorbs damage for the team.
Top Lane: The upper path on the map.
Tracking: Monitoring enemy movement across the map.
Tier One: The furthest goal pad from your home base.
Tier Two: The second pad (closer to home) after Tier One is destroyed.
Throwing: A misplay that costs your team a fight or the game.
Tanky / Bulky: Hard to kill due to high defenses and HP.
Ult (Ultimate): Most powerful move, typically on the ZL button.
Vision: The area of the map your team can see.
Xatu: Spawns once near the home base at the start of the game; provides experience.
Zoning: Using pressure or presence to keep enemies out of an area.
1P: First pick in the draft phase.
2P: Second pick in the draft phase.
Credits
This guide was created to help players improve and better understand the competitive side of Pokémon Unite.
Written and compiled by: Daniel Hernandez (BlackCH)
Special thanks to: UniteDB, Mathcord, Evocron, Jenn Jarret, Pussle, Virago, Rixelpick, Luna, and Meowrii for their invaluable information, corrections, feedback, and collaboration.
If you found this guide helpful, please consider sharing it or reaching out with suggestions for future updates.